Create a product listing
In this chapter you will learn how to
- Initialize the
useListingcomposable - Search for products
- Display products in a listing
- Implement a pagination
- Apply sortings, pagination, and filters
- Use the
helperspackage - Configure variants presentation for store API
Listing context
Product listing is a structure related to the predefined areas and it has always the same interface: ProductListingResult:
- Response of product-listing endpoint
/store-api/product-listing/{id} - Product search result
- Cms Page (via
product-listingelement, nested among other CMS element)
Listing type and context
Before using the composable, define the type related to the context:
categoryListingfor navigation/category/cms pagesproductSearchListingfor search page
const { search, getElements } = useListing({
  listingType: "categoryListing",
  categoryId: "dfd52ab937f840fd87e9d24ebf6bd245",
});
The categoryId is obligatory only if the current page is not a result of using useCms composable (generated from Shopping Experiences).
INFO
If the useListing composable is used within a CMS Page, categoryId is resolved internally.
Define search criteria
In order to get the expected products, we need to define the search criteria. This criteria is an object of type Search Parameters explained in documentation of API.
const { search } = useListing();

search({
  limit: 2, // get only 2 products
  p: 1, // page 1
  includes: {
    // things we actually need in the response for learning purposes
    product: ["id", "name", "cover", "calculatedPrice"],
    product_media: ["media"],
    media: ["url"],
  },
});
TIP
Don't use includes parameter if you want to have the whole entity object available in the response.
Display listing elements
In order to display products of product listing we need to:
- Invoke the
search()method with a positive result - Iterate over
getElementsarray of elements, where each element has theProducttype.
<script setup lang="ts">
const { search, getElements } = useListing({
    listingType: "categoryListing",
    categoryId: "dfd52ab937f840fd87e9d24ebf6bd245", // entrypoint to browse
    defaultSearchCriteria: { // set the default criteria
        limit: 3,
        p: 1,
    },
});

search({ // invoke search() method
  includes: { // omit this parameter if you want to use the whole product entity
    product: ["id", "name", "cover", "calculatedPrice", "translated"],
    product_media: ["media"],
    media: ["url", "thumbnails"],
  },
});
</script>
<template>
 <div>
    <!-- iterate the getElements array -->
    <div v-for="product in getElements" :key="product.id">
        {{ product.name }}
        <!-- use other properties of type Product -->
    </div>
 </div>
</template>
Sorting
Available methods of useListing to manage sorting order:
getSortingOrders()- returns all available sorting optionsgetCurrentSortingOrder()- returns the current order, available in the responsechangeCurrentSortingOrder()- sets the new order, invoking asearchmethod internally
// part of <script setup> section
const {
  getCurrentSortingOrder,
  getSortingOrders,
  changeCurrentSortingOrder,
} = useListing({
  listingType: "categoryListing",
  categoryId: "dfd52ab937f840fd87e9d24ebf6bd245",
  defaultSearchCriteria: {
    limit: 3,
    p: 1,
  },
});
Show all available sortings:
<!-- part of <template> -->
<select>
  <option
    v-for="sortingOrder in getSortingOrders"
    :key="sortingOrder.key"
    :value="sortingOrder.key"
    :selected="sortingOrder.key === getCurrentSortingOrder"
  >
    {{ sortingOrder.label }}
  </option>
</select>
Refresh the product listing on option's change:
const onOrderChange = (onOrderChangeEvent: Event) => {
    // accept the DOM Event and extract the option's value
    // pass the value to the listing method that triggers the search() method internally
    changeCurrentSortingOrder(
        (onOrderChangeEvent.target as HTMLSelectElement).value
    );
};
Add event listener to the <select> element:
<select @change="onOrderChange"></select>Enable adding to the cart
To achieve this, you can use useCart composable which expose addProduct method, including other useful functions to manage a cart.
// part of <script setup> section
const { addProduct } = useCart();
Utilize the method in a template:
<!-- part of <template> -->
<div>price: {{ product?.calculatedPrice?.unitPrice }} $</div>
<button @click="addProduct(product)">Add to cart</button>
Now, when the customer clicks the Add to cart button, a proper request is sent to the API. The cart is then refreshed and is up to date in the entire application.
TIP
Alternative tip - Instead of using useCart, you can use useAddToCart composable when you create a separate Vue component to keep a single Product for product listing. That option would enhance the code organization.
Add pagination
Pagination is available by using three methods from useListing composable:
getCurrentPagechangeCurrentPage- invokessearch()method internally with the provided number of the pagegetTotalPagesCount- calculates the number of available pages depending on products per page parameters (i.e.limitin search criteria)
// part of <script setup> section
const {
    search,
    getElements,
    getCurrentPage,
    changeCurrentPage,
    getTotalPagesCount,
    getAvailableFilters
} = useListing({
    listingType: "categoryListing",
    categoryId: "dfd52ab937f840fd87e9d24ebf6bd245",
    defaultSearchCriteria: {
        limit: 3,
        p: 1,
    },
})
The implementation can look similar to:
<!-- part of <template> -->
<div>
  <div>Pages: {{ getTotalPagesCount }}</div>
  <button
    v-if="getCurrentPage > 1"
    @click="changeCurrentPage(getCurrentPage - 1)"
  >
    prev
  </button>
  <span> {{ getCurrentPage }} </span>
  <button
    v-if="getCurrentPage < getTotalPagesCount"
    @click="changeCurrentPage(getCurrentPage + 1)"
  >
    next
  </button>
</div>
Using Filters
Available Filters
For more information about filters available in the Store API scope, see Search Queries > Filter
Available filters are strictly related to the aggregation's object available in the API response.
Built-in aggregations:
- manufacturer
- price
- rating
- shipping-free
- properties (contain all property entities configured in the admin panel)
Get list of all available filters
The diagram explains the source of available filters. The API response contains aggregations that are parsed into one interface structure.
In order to get the list of available filters, use the following command:
const { getAvailableFilters } = useListing(/** parameters omitted */);You can then iterate the filter objects available in the array. The filter object has a ListingFilter interface and depending on the code, or displayType, the handling process can be different. Let us have a closer look at it:
ListingFilter.code: manufacturer
<script setup lang="ts">
const { getAvailableFilters, getCurrentFilters, setCurrentFilters } = useListing(/** parameters omitted */)

const selectManufacturerAndSearch = (manufacturerId: string) => {
  setCurrentFilters({
    code: "manufacturer",
    value: manufacturerId
  })
}

// element from getAvailableFilters.value
// i.e: getAvailableFilters.value?.find(({code}) => code === "manufacturer")?.[0]
const manufacturerFilter = {
  apiAlias:"manufacturer_aggregation",
  code:"manufacturer",
  label:"manufacturer",
  entities: [
      {
        "extensions": {
          "foreignKeys": {
            "apiAlias": "array_struct"
          }
        },
        "_uniqueIdentifier": "1d39db66fd184de8bdcfbf995197f8ea",
        "versionId": "0fa91ce3e96a4bc2be4bd9ce752c3425",
        "translated": {
          "name": "Boomers Gourmet",
          "description": "Description",
          "customFields": {}
        },
        "createdAt": "2020-08-06T06:26:30.608+00:00",
        "updatedAt": null,
        "mediaId": "ef102a5043174d8b936623b175c8af57",
        "name": "Boomers Gourmet",
        "link": "http://www.gewuerze-boomers.de/",
        "description": "Description",
        "media": null,
        "translations": null,
        "id": "1d39db66fd184de8bdcfbf995197f8ea",
        "customFields": null,
        "apiAlias": "product_manufacturer"
      },]
    { // other manufacturer objects
    }
  ]
}
</script>
<template>
<h3>{{ manufacturerFilter.label }}</h3>
  <div v-for="manufacturer in manufacturerFilter?.entities">
    <input
        type="checkbox"
        :id="`filter-mobile-${manufacturerFilter.code}-${manufacturer.id}`"
        :key="manufacturer.id"
        :name="manufacturerFilter.code"
        @click="selectManufacturerAndSearch(manufacturer.id)"
        :checked="getCurrentFilters['manufacturer']?.includes(manufacturer.id)"
      />
      <label :for="`filter-mobile-${manufacturerFilter.code}-${manufacturer.id}`">
        {{ manufacturer.name }}
      </label>
  </div>

</template>- All available options for the Manufacturer filter are displayed in
v-forloop. Seeentitiesproperty for the same. - If the
manufacturer.idis present ingetCurrentFilters['manufacturer']array, set the option as checked. - On the
clickevent, invokesetCurrentFilters({code, value})method with code (manufacturer) and value (specific manufacturer ID) provided.
ListingFilter.code: properties
Properties is a generic type of filter responsible for displaying property entities that can describe a product that is configured on the backend side.
Despite being in the same filter group, every entity of property defined in the admin panel is available separately.
const ColorFilter: ListingFiler = {
  name: "Color",
  // other properties omitted
  options: [
    {
      id: "yellow-id",
      name: "Yellow",
      // other props omitted
    },
    {
      id: "green-id",
      name: "Gellow",
      // other props omitted
    },
  ],
};
Apply filter value
In order to apply a specific filter you need to be aware of:
- Filter code (see available codes at ListingFilterCode)
- Value
<script setup lang="ts">
const { setCurrentFilters } = useListing(/** parameters omitted */);

setCurrentFilters({
  code: "properties",
  value: "some-property-id",
});

// or

setCurrentFilters({
  code: "rating",
  value: 5, // 5 stars rated products
});
</script>
Get list of applied (active) filters or its options
<script setup lang="ts">
const { getCurrentFilters } = useListing(/** parameters omitted */);
</script>
<template>
  {{ getCurrentFilters.navigationId }}
  <!-- "category-A-ID-1" -->
  {{ getCurrentFilters.manufacturer }}
  <!-- ["manufacturer-A-option-ID-1"] -->
  {{ getCurrentFilters.price }}
  <!-- { min: 0, max: 299 } -->
  {{ getCurrentFilters.rating }}
  <!-- null -->
  {{ getCurrentFilters.["shipping-free"] }}
  <!-- false -->
  {{ getCurrentFilters.properties }}
  <!-- ["property-A-option-ID-1", "property-A-option-ID-2", "property-B-option-ID-1"]-->
</template>
You can achieve that by comparing stored value with displayed one.
| Filter | Where to find? | Data structure |
|---|---|---|
| Manufacturer | getCurrentFilters.manufacturer | array[id: string] |
| Price | getCurrentFilters.price | { min: number, max: number } |
| Rating | getCurrentFilters.rating | number |
| Shipping free | getCurrentFilters["shipping-free"] | boolean |
| Properties | getCurrentFilters.properties | array[id: string] |
The selected/active filters for its options/values are flattened and limited only to the bare values.
INFO
Active filters for Properties contain only the list of ID's of properties' option. Therefore, they don't have any meta-info explaining what is the source of the option.
Helpers package
The purpose of @shopware/helpers is to make developer's life easier.
In the present case, we could use the product's thumbnail or use the translated name, or even get the product details page's URL, if the application supports a routing.
// part of <script setup> section
import {
  getSmallestThumbnailUrl,
  getProductUrl,
  getTranslatedProperty,
} from "@shopware/helpers";<img
:src="getSmallestThumbnailUrl(product)"
width="100"
height="100"
:alt="product.name"
/>
<a :href="getProductUrl(product)">
{{ getTranslatedProperty(product, "name") }}
</a>Variants presentation
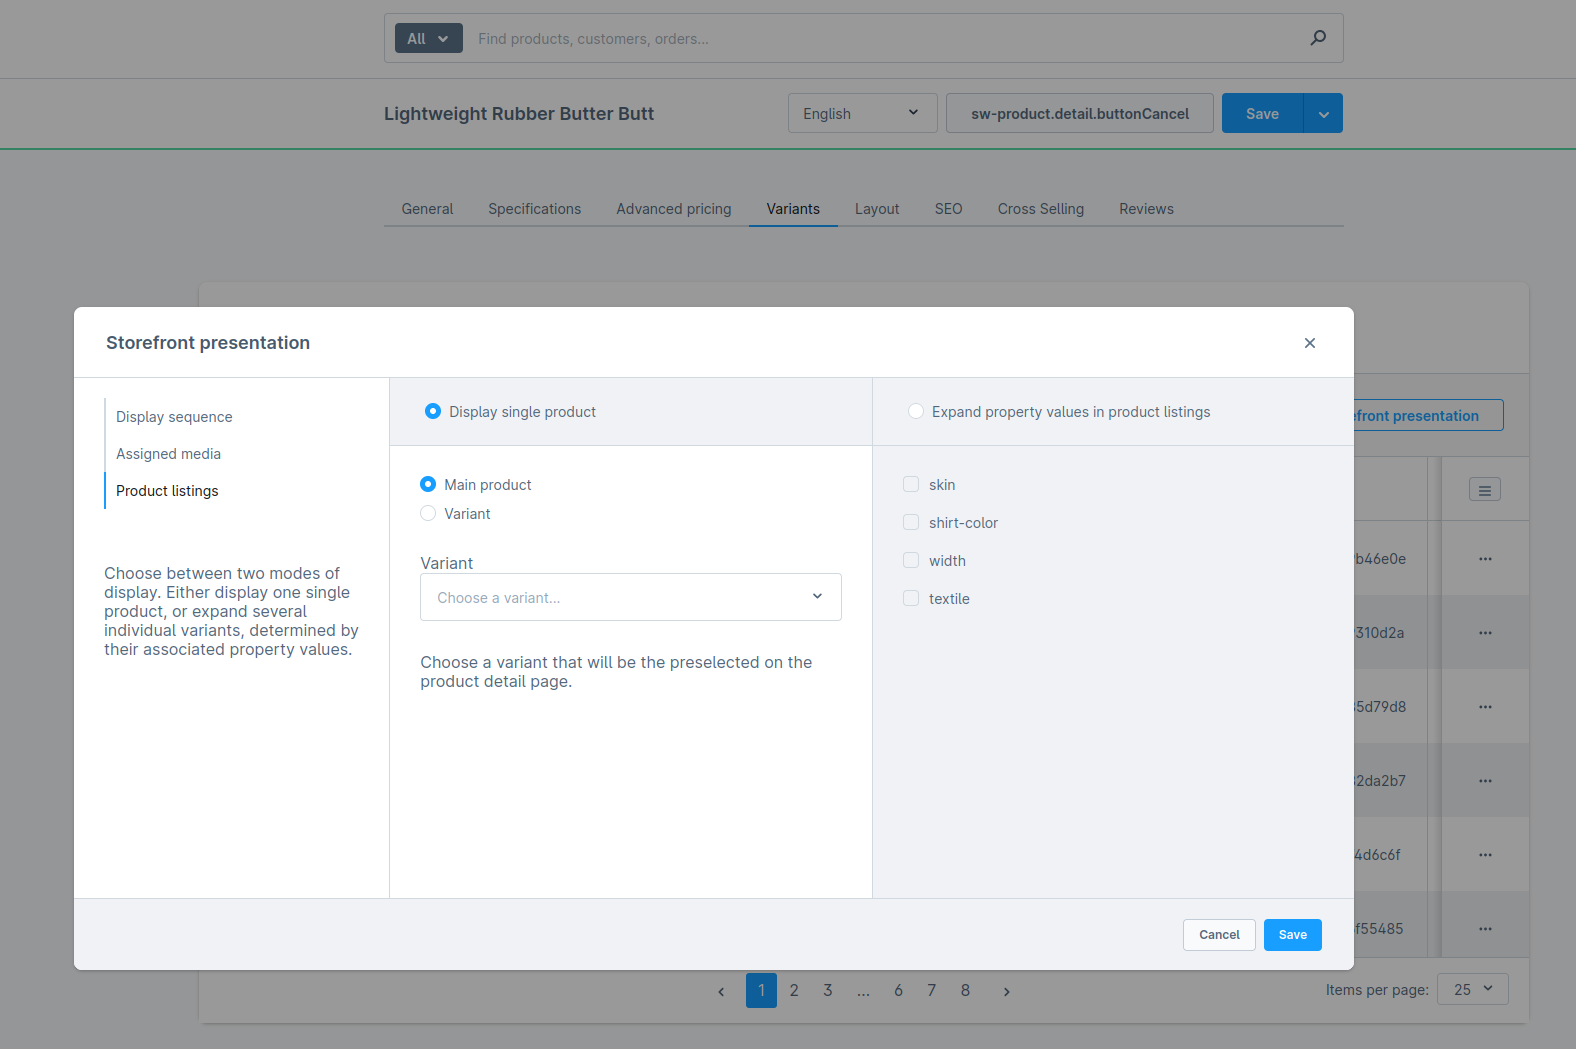
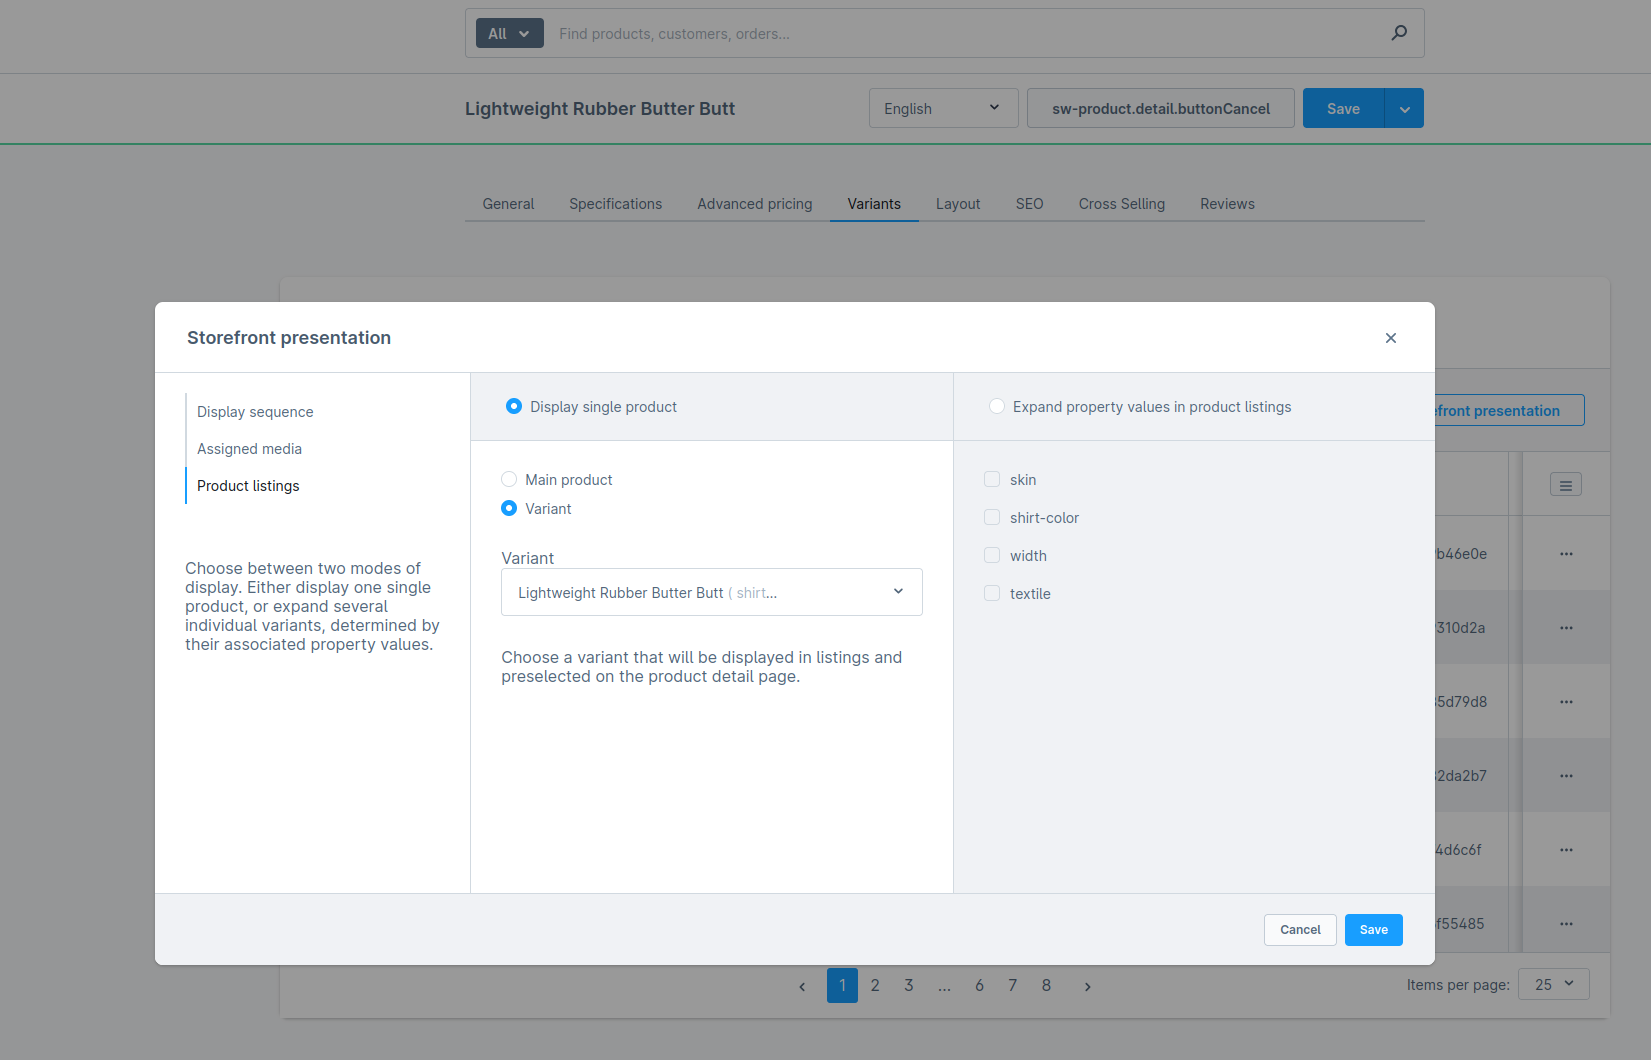
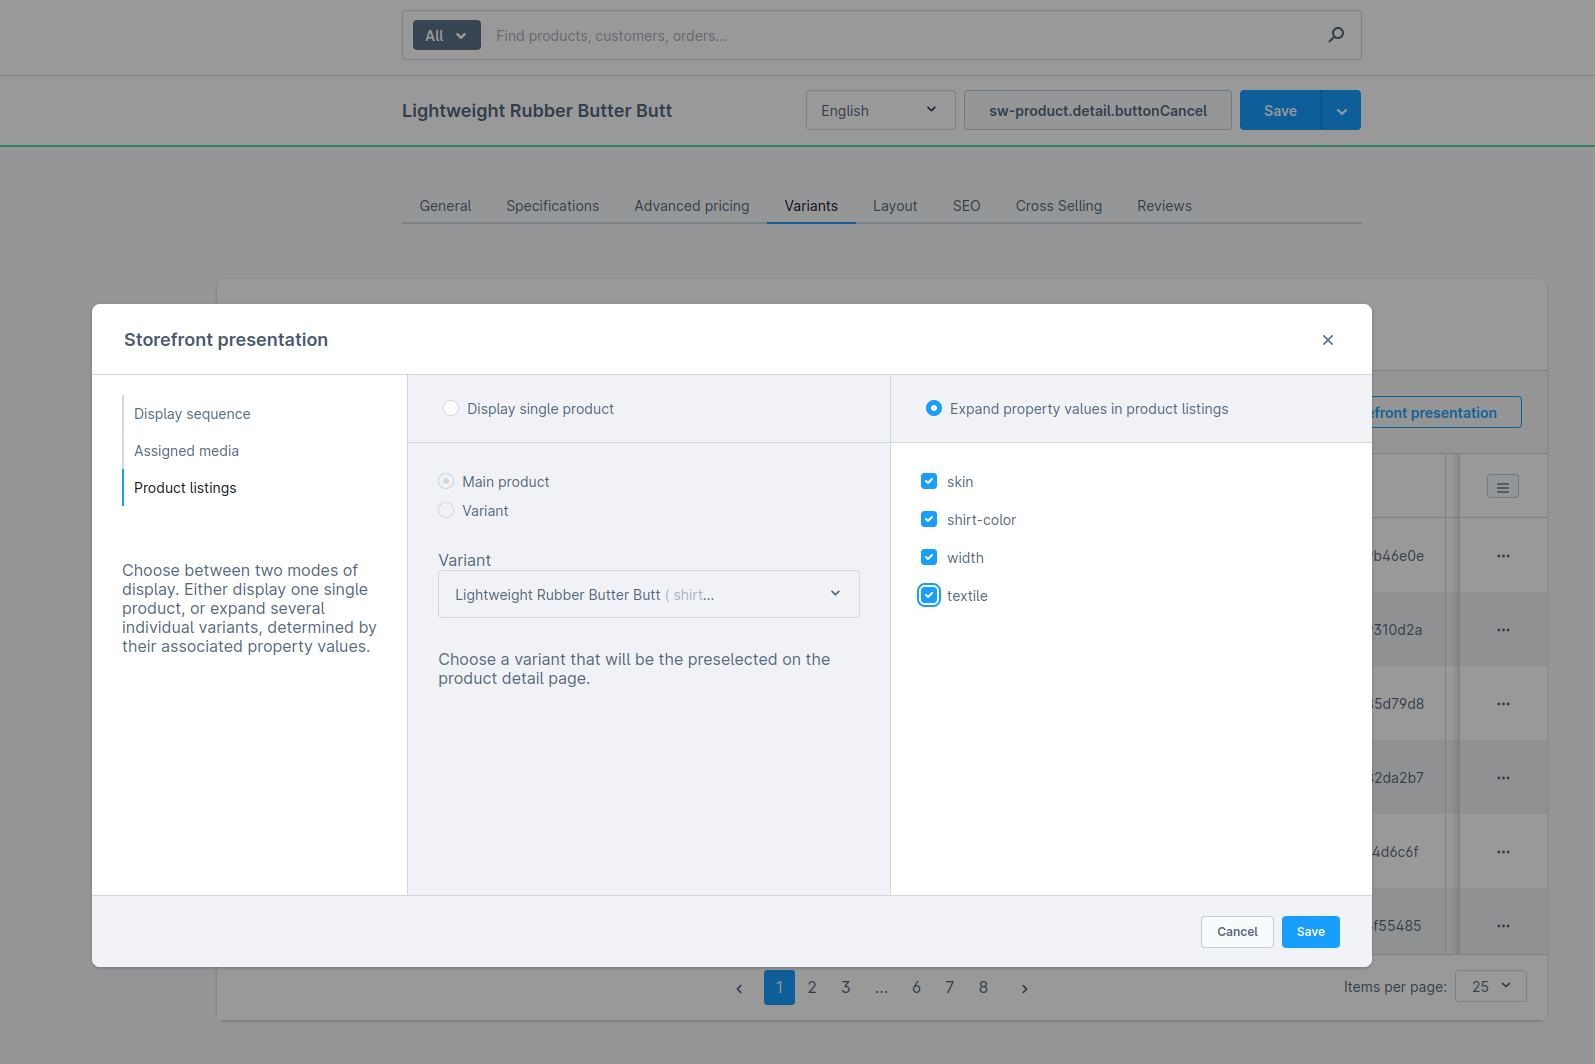
You have three different options for presenting your variants to your audience. These can be configured via the administration, for every product with variants. In this section, we explain how the output of the store API changes depending on the configuration. The default option is Expand property values in product listings without any property selection, this leads to a randomly selected variant.
To open the Product listing configuration for the Storefront presentation (also changes the output of the store API), proceed as follows in your administration:
Hover over Cataloges > Click on Products > Use the Search or Pagination to find your Product > Click on the Product with Variants you want to change > Click on the Tab Variants > Click on the Button Storefront presentation > A new window/modals opens > Click on Product lists on the left side > Here you can change the configuration of how the product with variants should be presented.
Additional ressources
More about Variants can be found in the Customer documentation. If you want to customise a product, please also check Custom products and do not use variants.
Display single product (main product)
Configuration is set to Display single product and Main product is selected. 
Changes you will see in the store API output with that configuration:
- The store API returns
one element - The data comes from the
Parent (main) product, e.g. stock, sales, product number and so on. - If the association
childrenis set, all the variant product data is returned in thechildrenarray- The
childCountshould be greater than zero, it should contain the number of all possible variants
- The
parentIdandoptionsIdswill always be null
Too many children & big json files
It is good practice to return only the necessary data in your custom frontend. This means selecting only the required children and monitoring the JSON file size. Large files can slow down performance as they need to be downloaded and parsed.
Display single product (Variant)
Configuration is set to Display single product and a Variant product is selected. 
Changes you will see in the store API output with that configuration:
- The store API returns
one element - The data comes from the selected
Product variant, e.g. stock, sales, product number and so on. - If you add the association
children, an empty array is always returned, as a variant cannot be a parent product - The
childCountshould be zero, as a variant cannot be a parent product parentIdwill contain the id of the parent product andoptionsIdswill contain the options from that variant product
Use case example
You always want to display the cheapest product on the product list as preselected. So that the customer can add it to the shopping cart more quickly.
Expand property values in product listings

Changes you will see in the store API output with that configuration:
- The store API returns
multiple elementsfor each selected property, but not the parent product - Data will be collected from the matching Variant products e.g. stock, sales, productNumber and so on.
- If you add the association
children, an empty array is always returned, as a variant cannot be a parent product - The
childCountshould be zero, as a variant cannot be a parent product parentIdwill contain the id of the parent product andoptionsIdswill contain the options from that matching variant product
Use case example
You could expand a property like color to display all the different images of a T-shirt directly in the product listing. The size selection can still be made on the product detail page so as not to overload the product list.